Tag Archives: Mothercare

Review: Silver Cross Reflex Pushchair

Posted on by
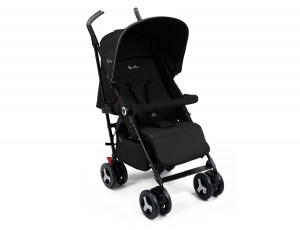
Silver Cross Reflex Pushchair

Silver Cross Reflex Pushchair

You’ve got a baby along the way, and you are wondering what kind of stroller to get that would suit your style, your baby and your needs.

Or you already have a toddler, and you have a newborn (like me), and are in the market looking for another stroller that would suit your needs.

Or you could just want another stroller. Maybe you collect strollers. (I don’t know! I mean..there could be people like that out there. =P )

Well, let me tell you a little (actually a lot) about the Silver Cross Reflex Pushchair. It is the epitome of plush, luxurious and comfort. If that’s what you’re looking out for your baby, then you should definitely check it out.

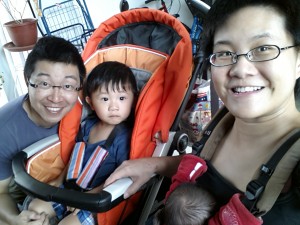
definitely was in the market looking for a stroller that could suit my needs. I have a 2.5 yo toddler, and a 5mo baby. To save my sanity, I have slowly but surely figured out a way to go out with two kids in tow. A little harrowing, but we’ll live. It basically goes like this – QT in the baby carrier and Ollie in the stroller, diaper bag loaded with essentials (usually Ollie’s toys, books and snacks) hooked up at the back of the stroller. And we’ll take a 20-min walk to the train station.

kinda like this, minus Daddy Ting

kinda like this, minus Daddy Ting

What drew me to the Silver Cross Reflex was that it allowed for BOTH parent-facing & front-facing, which means that I can get to see QT if I wanted to. Hmm. The current stroller we have is a travel system, which meant that in order for me to be able to see QT in a parent-facing mode, we would have to fit the infant car seat in.

Umm..definitely not going to happen if I were to go out alone with the boys. Where am I going to put the car seat when Ollie needs to nap in the stroller??

So here is my take on the Silver Cross Reflex:

Firstly, it is plush and it is comfortable. I couldn’t help running my hands over the seat liner. It was smooth and nicely padded. When I opened up the newborn accessory pack and took out the baby nest, OMG. Seriously, at that moment, I could only wish I was a newborn too, so that I could lie on it.

Okay, now that I’ve gotten that out of the way, let me talk about the rest of it. Haha.

The Reflex in Toddler-mode

Ollie is about 12kg and about 90cm tall so as to give you a rough idea of how it suits the toddler.

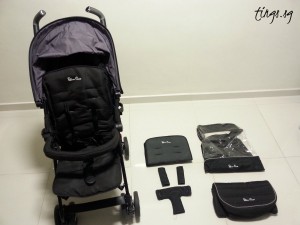
Pushchair & the accessories

Pushchair & the accessories

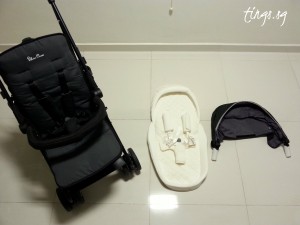
The Reflex comes with the following accessories: seat liner, straps & buckle pads, a very lightweight rain cover, a foot muff and car seat adaptors for the Silver Cross Simplicity car seat. Now that is pretty much as much accessories you will need for the stroller. We probably won’t be using the foot muff very much in this hot and humid Singapore weather. But it would be really useful if we decide to take this stroller along when we go for a winter holiday.

5-point safety harness

5-point safety harness

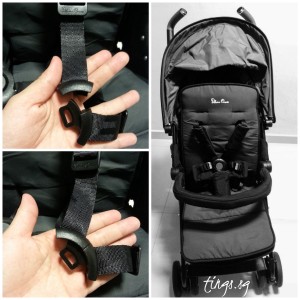
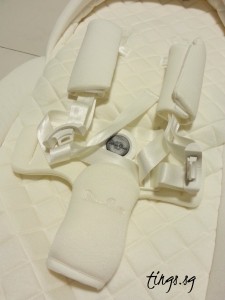
Like most strollers, the Reflex boasts of a 5-point safety harness for the child. What I felt was different was the buckle was literally made up of 5 pieces. As you can see in the photos on the left, to form a clasp, you would need to attach two parts together. And to further reinforce the safety, the lower piece of the clasp can be threaded through the padding so it would not slip out easily if it is not buckled properly (see right photo).

My view is that although there is a strong focus on safety, it can get a little fiddly, especially when you are squatting/kneeling down with a baby in front and trying to strap the toddler in. I’d imagine if I was alone with just one kid, that would have been a major plus point for me. Having said that, I could do away with the buckle padding and just strap Ollie in..but to miss out on the comfort? *whines* It would probably give him a bad wedgie without the padding. *grumbles*

stroller canopy

stroller canopy

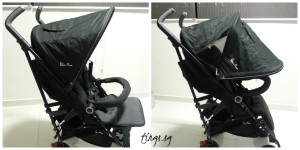
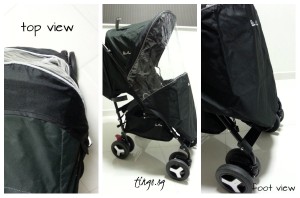
Now, this is another plus point. The Reflex has a canopy that offers really good coverage and is a UPF50+ sun protection hood with breathable mesh panels. Our current stroller allows such extended coverage only if the stroller is in an upright position. If the stroller was reclined fully, the coverage was probably as much as what you would see in the left photo. However, the extended coverage for the Reflex applies to even when the stroller is fully reclined. No more taking an extra nappy/swaddle cloth to just cover to keep bright lights out as Ollie naps.

And if you use the canopy when you are outdoors, you would want to see what the kiddo is doing under the canopy.

Canopy peep-flap

Canopy peep-flap

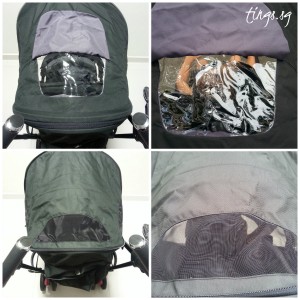
What I really liked about the peep flaps is that there is a clear vinyl peep flap for normal canopy coverage and a breathable mesh peep flap for the extended cover. The clear peep flap really works for me because I can see what mischief he is up to. After having to live with a mesh opaque peep flap for a few years, this was really awesome. I no longer have to walk in front to look at Ollie.

toddler product testing

toddler product testing

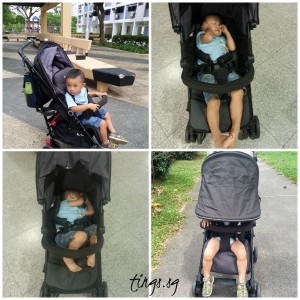
What I also liked about the stroller was that it has a streamlined body. Ollie was able to comfortably rest his arms on the stroller bar, without having to lean forward and strain against the strap. In being streamlined, Ollie could see more with just a turn of his head, compared to having to lean forward to look around the stroller. And don’t be deceived by it looking narrow. It is spacious and deep inside. There was even enough room for him to turn on his side to nap, and long enough for his feet to not dangle a lot off the end of the stroller.

The best part of it, when fully reclined, it is almost flat. That is as good as being on a bed. However, the down side to this almost-flat recline is that the stroller will tip backwards easily if it is bumped from the front. This is easily rectified if the stroller is raised one notch up from its full recline.

Raincover

Raincover

The stroller comes with a lightweight rain cover that fits snugly over the canopy and goes all the way down to cover your little one’s toes. It has holes at the side of the clear plastic, allowing for ventilation. As the raincover only covers the front edge of the canopy, I am not sure if the canopy is waterproofed so that water will not drip into the stroller anyways.

Upping the safety another notch, the stroller comes with LED lights on the sides which has three modes: constant, flash and rotate; and it also has reflective outlines on the stroller. This will make the stroller, even a black one, visible in dark conditions.

The Reflex in Newborn-mode

QT is 7.1kg and about 63cm long.

Newborn Accessory Pack

Newborn Accessory Pack

The Newborn Accessory pack is an option item that you can purchase to convert the Reflex into a parent-facing stroller. Ever since we were expecting Ollie, I was always keen on having a stroller that would allow me to see my baby especially when they are that young.

Now that I have a second chance with QT, I bought the accessory pack to try it out together with this review. The accessory pack comes with a babynest, a canopy and an apron to cover the feet. When I unpacked the accessory pack…

now can you say plush??

bamboo babynest

bamboo babynest

This has gotta be the most luxurious babynest I have ever felt. Okay, granted it is the only babynest that I have ever felt. The deeply padded babynest is covered in bamboo jersey fabric that is really soft and gentle against baby’s skin. With our current stroller, each time we went over a bump, QT would reach out his hands as though he wanted to grab something. With this babynest, he has only casually just looked around as though nothing happened.

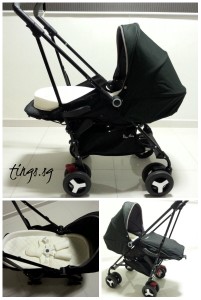
When assembled, the parent-facing Reflex now looks like this:

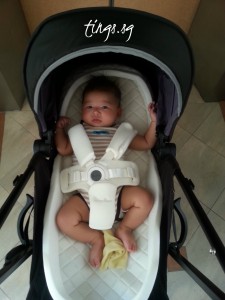
Parent-facing Reflex

Parent-facing Reflex

All you need to do is to remove the canopy, remove the bumper bar and fully recline the seat, attach the babynest and newborn canopy..voila!

When I first learnt that there was a newborn accessory for the Reflex, I had hoped that it would be convenient for me to bring along when I went out, and that it would be easily interchangeable for when it suited my needs.

Unfortunately, that is not to be the case. The canopy and the babynest are too bulky for me to bring along alone, and attaching the newborn accessories onto the stroller requires some dedication. And when I say dedication, it is in a good way. To fasten the babynest securely, I would actually have to slide a pocket onto the seat, secure a loop on the babynest to a knob on each side of the stroller, and secure it to two D-rings on each side of the seat. Basically, the babynest is as secured as the seat itself. It also comes with a 5-point safety harness for the baby.

Having said that, I have been out with the hubby over the weekend and tried interchanging between the newborn mode and toddler mode, complete with a 3-4kg diaper bag in tow. It gets easier with practice, AND the canopy/bumper bar or babynest/canopy combo can fit into the basket with some squeezing. So it is doable but you will lose out on the basket space and it is easier if you’re doing it with another person.

QT wasn’t really sure what to make of the new position as he is not used to being able to see me when in the stroller. That, and because he is mostly in the baby carrier when we go out.

hrm.

hrm.

I love being able to see QT when pushing him in the stroller! Now..the downside to this is that you have to find a position you are comfortable with to put the baby in and take the baby out. On my first attempt, I naturally went between the handles to put him in. *sigh* see, I am not the slimmest of all persons but I am not that plump/fat either okay. But I did struggle to squeeze through the handles to comfortably put him in. It is easier to put the baby in from the sides, but only if the canopy is down. As you can see from the side view of the parent-facing mode, that the frames on the sides are fairly high and so would be awkward to place the baby in from the side with the canopy up. So that is really tricky. And if I were to hang my diaper bag as well, I would have no choice but to put QT in from the side.

The other downside would be very limited access to the basket because again, the seat is fully reclined. Weight distribution wasn’t so much of an issue this time as the weight is pretty much concentrated in the front so I didn’t have to worry much about the stroller tipping over with a diaper bag at the back.

Apart from that, I am loving the versatility of the stroller with the parent-facing mode. And QT obviously is enjoying “business class” ’cause..

Business Class

Business Class

every trip in the stroller always ends up with him falling asleep, even in the front facing position! See what I said about the stroller being a comfortable thing??

Conclusion

Overall, at 8.5kg, the Reflex has a sturdy frame and has wheels that seem to glide over bumps very easily. Don’t get turned off by the endless buttons and knobs that is littered around the frame. This is what makes it so versatile without all the additional clips that would make it bulky. It also has a fairly huge basket that is easily accessible when the seat is in an upright position. The seat is also ergonomically designed in such away that the seat is separated from the structure. There is a gap between the seat and the structure, big enough for my hand to pass through when upright. And this is even so when Ollie is sleeping on a full recline position, my fingers could still pass through between the seat and the frame! So he won’t feel any of those hard parts of the frame.

diaper bags on the stroller

diaper bags on the stroller

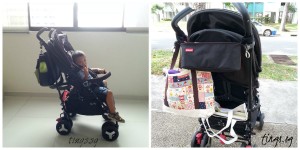
L: JJ Cole diaper bag for long trips out, secured with bag hooks on each handle

R: Wide tote diaper bag with stroller organiser for short trips out.

As with all other umbrella strollers, there are some cons to it. The most common one is probably the counterbalancing issue. With an empty stroller and a diaper bag weighing about 4-5kg, a slight bump to the front of the Reflex will cause it to tip backwards. Because of the design of the umbrella stroller, access to the opening of the basket from the back is generous, however, the space is limited by the frame that it sits on. In addition to that, once the stroller is in a full recline position, you will not be able to access the basket from the back. My other grief with it is…there is no cup holder! Argh..where to put that cup of Starbucks coffee that this mummy needs sometime during the trip out? *horrified* I have resolved this with a stroller organiser with a cup compartment to put items like wallet, phone, small pack of wipes and yes, that desperately needed cup of coffee!

The stroller does come with a generous pouch on the canopy, however I have found it to be too unstructured as it is attached to the excess part of the canopy, so it swings a bit when I try to get my stuff from the pouch. Hence getting items from the pouch is actually more inconvenient than getting it out of the diaper bag.

Stroller Storage

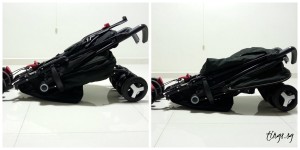
Stroller Storage: L – with babynest, R – normal stroller

Storage of the Reflex is simple, by just lifting up a catch with our feet, stepping on a lever and pushing it down till the side catch clips on to secure it together. What makes this different to the other umbrella strollers that I have come across is that when folded, the wheels do not touch the canopy. That was one of the reasons why we did not buy an umbrella stroller. Donald was iffy about the dirty wheels touching the canopy. The front wheels of the Reflex, when locked, point away from the canopy, which kinda ensures that the canopy will not get dirty! The Reflex can stand when folded, only if the brakes on the back wheels are engaged and if it is leaning against the wall. Otherwise, you will have place the stroller on the ground like in the photo, and have to bend down to pick up the stroller.

If you are looking for a stroller that provides the versatility of being both a parent-facing stroller and a front-facing, one that has all the bells and whistles without too many clips and buckles (just tiny little buttons and knobs), and one that is spacious and yet doesn’t take up too much space, and most of all…

comfortable…

I  reckon you should give the Silver Cross Reflex Pushchair a go.

FAQs

How was the Silver Cross Reflex Pushchair tested?
My kids and I go out fairly often and I get to walk A LOT. This stroller has been tested at a wet market, malls, up/down escalators, in lifts, over paving blocks with gaps, up/down steps, slopes.

Where can I find the Silver Cross Reflex Pushchair?
The Silver Cross Reflex Pushchair can be found at the following retail outlets: Mothercare,

Where can I find the Newborn Accessory Pack and how much is it retailing for?
The Newborn Accessory Pack can be found at Mothercare and is currently retailing at S$100.

Disclaimer: I received a complimentary set of the Silver Cross Reflex Pushchair from Mothercare to write this review. The Newborn Accessory Pack was fully paid for by myself initially but was refunded to me after writing this review. All opinions are solely mine and are written as objectively as possible.

Category: Reviews | Tags: ,

Review: Unimom Forte# Double Breast Pump

Posted on by

Shortly after I completed the review of the Tommee Tippee Closer to Nature Electric Breast Pump, I was offered another opportunity to test out a breast pump by the latest entrant into the Singapore market, Unimom: the Forte# Double Breast Pump.

Hell yeah! Call me the “breast pump lady” man..(says the husband).

The Forte# is a hospital grade electric double breast pump and is made in Korea. Now, I do own a “modified” double breast pump (I’ll write about that one another day) so I had certain levels of expectations for double breast pumps. On the other hand, the one I owned is not of a hospital grade, so that definitely piqued my curiousity of what the term “hospital grade” meant.

Donald collected the kit on his way home from work since it was difficult for me to lug two kids along with me, not knowing how big/small the box was going to be. Thankfully both kids were asleep when he brought it home. I eagerly pounced on it and was surprised at the weight of the bigger of the two boxes. How heavy was this thing??

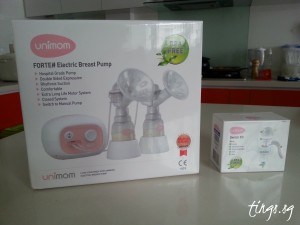
Unimom's Electric Double Breast Pump & Switch Kit

Unimom’s Electric Double Breast Pump & Switch Kit

So in the bag was two boxes, the Forte# Electric Double Breast Pump, and a Switch Kit. The Switch Kit allows you to convert the electric pump into a manual pump. Who in the world would want to use a manual pump when you have an electric one?? Okay..desperate times calls for desperate measures. We still put it to the test but more on that later.

Parts
To be honest, when I first opened the box for the breast pump, I was a little overwhelmed by the amount of pieces inside the box. This presentation was a little unlike my other two pumps where you would have a tray with pieces and parts lying nicely. The parts of the Forte# came individually packed in zipped storage bags. The more I unpacked the more overwhelmed I was, considering the manual came in a brochure/pamphlet liked format. Yikes!

The pieces involved in the the box.

The pieces involved in the the box.

Okay..calm down. One step at a time. I’m sure we can do this. So here goes to slowly figuring out the pieces. On first glance, I was a little worried that washing and sterilising the parts were going to be a little  tedious.

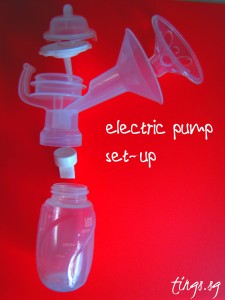
the pump set up.

Top to bottom: top cover, large membrane & bottom cover (in one piece), breast shield & silicone massager, white valve and bottle

Now, as the pump comes with a motor and does not allow for the use of batteries to make it more portable, there is an alternative option of buying the Switch Kit to convert it to a manual pump so that you still can bring it out should you need to pump on the go. The Switch Kit did not come with a manual; you pretty much have to depend on the picture on the box to figure out how to set it up. I have not used a manual pump before so it took this “mountain tortoise” a while to figure it out how the pieces fall together.

the Switch Kit to convert the pump to a manual one

the Switch Kit to convert the pump to a manual one

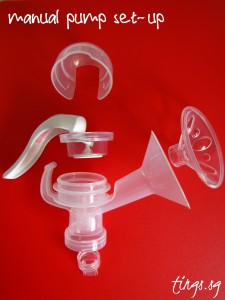
 the manual pump set-up

Top to bottom: Diaphragm cover, handle, silicone diaphragm & stem (in one piece), breast shield & silicone massager, valve.

You see the little hook-like extension on the breast shield? Now you make sure that you hear a click (may be a clack or thwack ..you get the drift) to secure the handle onto the breast shield. There is a little groove under the handle to lock it onto the breast shield. Otherwise the diaphragm cover and whatever that is sitting under it may go flying as I learnt *grumbles*.

After the initial pump, the assembly of the parts didn’t seem as daunting any more. Firstly, as the top cover, large membrane and bottom cover of the electric pump set-up did not come into contact with the expressed milk, there was no need to constantly detach it from the tubes to wash and sterilise them. You could pretty much leave it like this:

post pumping

post expressing

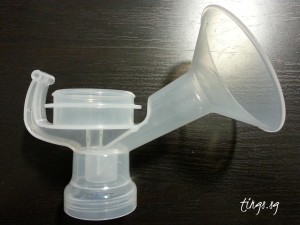
At the same time, unlike the other two pumps I have, the breast shield is one entire piece compared to the funnel & the connector on the Medela Swing, and the silicone cup & the hard valve on the Tommee Tippee Closer to Nature Electric Single Pump. This was a plus point as I did not constantly have to worry about the parts falling off / getting loose after moving about, nor did I have to wash an extra part!  The other plus point about the design of the breast shield was that due to the angle of the funnel-like area, it would not allow for any pooling of milk as it flows directly into the valve.

breast shield

breast shield

As much as there are pros to the design of the breast shield, there are the downsides to it too. The design meant that I had less one part to wash, but it also meant that it was harder for me to wash some parts of it, mainly the narrow area after the opening of the breast shield. You would probably need to invest in a tiny brush to wash that area.

Although having the breast shield in one piece meant no loosening of parts, it also meant that it was harder for me to use it together with my hands-free breast pump bra. Most people using a double pump would have probably invested in a hands-free breast pump bra for convenience and I am one of them. By having two parts to the breast shield meant that I could insert the funnel into the pump opening in the bra before attaching the connector with the bottle to the funnel. Having the breast shield in one piece meant that I had to put on the bra, and stretch the pump opening in the bra to fit the breast shield through. This could potentially mean more wear and tear on the bra in the long run.

Forte# vs Swing: handsfree breast pump bra

Forte# vs Swing: handsfree breast pump bra

I have tried attaching other brands of milk bottles to the breast shield to see if it would fit. Unfortunately Medela bottles do not fit with this breast shield. There is however a wide cap adaptor available for wide neck bottles like MAM and Avent ones.

Usage / Expressing
Electric option
Now, this pump does not have different settings for let-down reflex and speed/suction. It has just one dial, and you have to figure out what kinda works best for you to trigger the let-down reflex. The speed of the suction also remained constant through the various strength of suction as compared to the longer suction/tug at a higher strength for the Swing post let-down phase.

Let’s just say the Forte# and I had a rocky start, probably because I was new to this dial thing. Not having a let-down phase like the Medela Swing and Tommee Tippee pump kinda threw me off a little.

On my first attempt, I started by turning about 1/3 of the dial. I have to say this silicone massager is a step up from the Tommee Tippee silicone cup. Where the Tommee Tippee silicone cup massages the aerola to express the milk, the Unimom silicone massager actually massages the breast and the aerola to draw out the milk. I could feel it pulsing around my breast to help with the expressing. The expressing was really gentle at 1/3 in, so gentle that it did not seem to express anything at all.

So I turned another 1/3 of the dial. The suction was still very gentle. It could be that I was used to the stronger suction of the Swing, or even the Tommee Tippee pump. Physically, I felt almost as though there was no suction going on, however, visually, I could see the tug of the nipple getting longer. And again, there was still no milk being expressed despite having a full breast on one side. Hrm. I was getting a little disappointed. Still, there was room to move the dial, so I moved it to the maximum. This time round, I could feel the suction and finally it triggered the let-down reflex.

There we go. Phew! It took a while (about 10 minutes) but once you are on the go, it got better. For me, at maximum, the pump triggered my let-down reflex a couple of times, which meant a fairly good flow of milk being expressed. All this and without the pain of a strong suction. I was comfortable through the entire 20-minute session. I was able to see the milk being expressed and the milk dripping out of the valve into the bottle.

By my fifth attempt, I figured to go in straight at 2/3 of the dial to trigger the let-down of milk. It worked. Different people need different suction strength to trigger the let-down and for me, because I was used to the strong suction of the Swing, I had to start off with a fairly strong suction before I get the let-down. A friend who is a working mom had mentioned that for her, a pump that could trigger a let-down quickly is a major plus point for her because waiting for the let-down means being away from her workstation for a longer time. So I guess it really boils down to figuring out what works for you.

Expressing subsequently got smoother for me and hey, I think both the Forte# and I are pretty good friends now eh? I wouldn’t say best friends only because the design of the breast shield is being a little brutal to my handsfree breast pump bra.

Having the silicone massager around the breast also assisted in expressing more milk in my opinion. I usually express about 100ml for the first pump of the day, however the Forte# yielded 120ml. Hey, an extra 20ml is still an extra 20ml. We all know how precious breastmilk is!

One thing I didn’t like about the silicone massager was that, unlike the Tommee Tippee silicone cup which was sealed around both ends of the funnel, this was just cupped around the opening. Which meant that milk would seep between the silicone massager and the breast shield (see how short the silicone massager is). It would then leak out if the pressure between the shield and the breast was lessened. Also because of the design of the shield, removing it out of the handsfree breast pump bra was more difficult and I had to reach inside to wipe off milk that had pooled on the silicone massager so it wouldn’t leak onto the bra/top/pants.

The motor, whether a low strength or high strength, is ridiculously quiet. Almost like white noise. Even the husband was impressed at how quiet it was. The Swing at high strength does sound as though it is straining.

Manual option
Again, I have never used a manual pump before. I have a couple of friends who used one; one said she got nothing out of it, the other was using it all squeaky (I could hear the squeak of each pump!) and when she emerged from her room, the output looked miserable. Not a very good impression obviously.

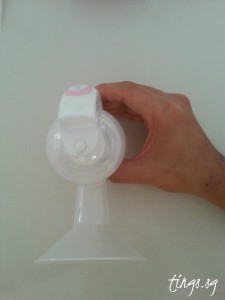
So when I finally gave it a shot, I wasn’t expecting much. When I started depressing the handle, I could feel the suction. However, I lost the suction 5 depressions in. The top cover had loosened and was not making a tight seal. It wasn’t until a couple of uses later that I realised the diaphragm had to be “locked” around the edges of the breast shield in order to form a tight seal, kinda like how the silicone massager sits on the breast shield. Once the diaphragm sits snugly on the breast shield, I could pretty much pump with one hand, or if the breast has softened after it has almost emptied, I would use another hand to press the breast shield against the breast so as to ensure a tight seal around the breast.

the seal between the breast shield and the top cover

the seal between the breast shield and the top cover

Having said that, once I got that issue out of the way, manual pumping was actually a breeze. Because I could control how fast/slow I could depress the pump, it triggered milk let-down fairly quickly. I was able to express 100ml in about 15 minutes. Having to constantly depress the handle for 15 mins also didn’t tire my hand out as I thought it would.

how far I needed to depress the handle for expressing

how far I needed to depress the handle for expressing

Accessories
Bottles/teats/disk
The pump set comes with two bottles, bottle covers, teats, caps and disks. This makes is really convenient as it works as both a milk bottle and a breastmilk storage bottle. The teat is also designed to fit any standard neck size bottle. I tried the milk bottles on QT twice; once fed with by my mom and another by me. Both of us decided that we (including QT) didn’t like the bottle. For me, there wasn’t a valve that allowed air to escape whilst QT was drinking, which meant that he would just keep sucking and it would get to a point where he would have difficulties sucking because of the pressure inside the bottle when no air was going in. I would have to pull the bottle out, allow air to enter the bottle before resuming the feed.

And some of us moms know that when you interrupt the feed sometimes, it is hard to get the baby to resume the feed. Argh. So major negative point for me.

Bottle stand
The pump set comes with two bottle stands, which is a godsend. Sometimes the amount of milk I express is not enough to counter-balance the weight of the breast shield and the bottle tips over. Argh. I can manage with a single pump, but when it comes to two bottles, I am not taking any chances with spillage of milk. The bottle stands are fairly deep so it holds the bottles snugly and you don’t have to worry about it tipping over.


FAQs

Can I use a microwave steriliser to sterilise the parts?
Yes, the parts are microwave safe. The silicone massager may deform slightly when heated, however upon cooling, it will return to its original shape. 

Where can I find the Unimom Forte# Electric Double Breast Pump?
The Unimom Forte# can be found at the following retail outlets: Mothercare, Kiddy Palace, Pupsik Studio & Smart Little One

How much is the Unimom Forte#?
The Unimom Forte# is retailing for S$299, and the Switch Kit is retailing for S$19.90. Currently, there is an ongoing promotion where you can get a Unimom Forte# bundle at S$249 consisting of the following items: the Forte#, Switch Kit, Cooler Bag with 5 bottles & 2 ice packs included, and 25 pcs of breast milk storage bag

Are the parts to the Unimom Forte# replaceable and where can I find the parts?

You can replace the parts at Not Too Big, a retail outlet and service centre for Unimom products. Not Too Big is located at Forum Level 2 and is open from 9.30am -6pm.

Disclaimer: I received a complimentary set of the Unimom Forte# from Mothercare to write this review. All opinions are solely mine and are written as objectively as possible.
Review: Tommee Tippee Closer to Nature Electric Breast Pump

Posted on by

When Ollie was born, being a first time mom, I was ignorant about how frequently I needed to either latch Ollie or express in order to establish the supply. Donald and I had done our research and bought the Medela Swing, which we believed to be the most economical choice at that point in time. I used the pump really sparingly as it was quite depressing to see the poor milk yield compounded by me supplementing Ollie with formula. I probably used the pump for half a year before it never saw the light of day again.

Well..till I got pregnant again.

Second time round, with Quentin being a pre-term baby and having to spend almost two weeks in the Special Care Nursery, it meant that I had to express breast milk so that I could bring it to the hospital for the nurses to feed Quentin. It also meant that I had to express more aggressively so that I could establish a decent supply. You know..just in case.

During that two weeks, I was expressing every 3-4 hours with a somewhat strong suction. Strong enough to leave a light bruise on my breasts after each session. So when Mothercare Singapore offered the opportunity to trial the Tommee Tippee breast pump, I grabbed it.

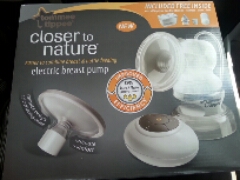
packaging

packaging

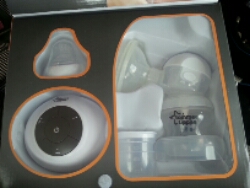
Peep flap of items included (except storage box)

Peep flap of items included (except storage box)

A silicone cup on the breast. Surely that would be WAY more comfortable on the breast, no? A win already.

I am a major fan of Tommee Tippee products and the pump would complement the products that I have. No more pouring of breast milk around. Another win.

Here are my thoughts on it after a month of usage:

Parts

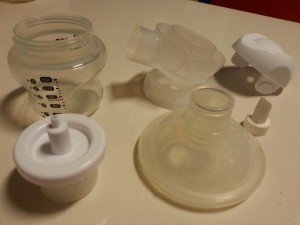
Tommee Tippee pump parts

Tommee Tippee pump parts

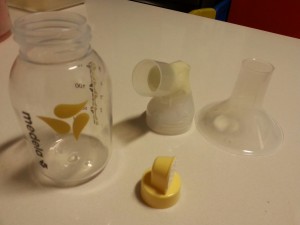
Medela Swing pump parts

Medela Swing pump parts

The Tommee Tippee pump has more parts than the Medela Swing. However, the parts are not too tiny that it is hard to wash. The parts are big enough to be washed with a sponge. It is also easy to assemble the pieces back together. Silicone cup can be separated from plastic funnel for more intensive washing. Although bulky, it actually makes it more comfortable to hold it to the breast, with fingers more spread apart compared to the Swing, where I find my fingers/wrist having to be bent at a sharper angle due to the smallness of it.

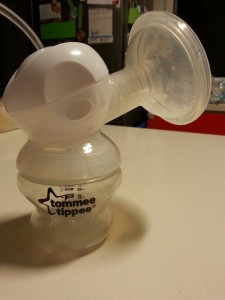
Assembled pump

Assembled pump

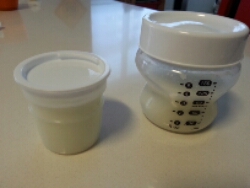
The pump attaches to a Tommee Tippee bottle, or alternatively, into 60ml storage pot which sits nicely in the Tommee Tippee bottle. This works very well for me as both my kids adapted to the Tommee Tippee teats very easily, so not having to pour the expressed milk from one bottle to another bottle is very convenient for me. Tommee Tippee also has lids for their bottles for easy breastmilk storage (Box of 2 lids for S$6 at Mothercare).

Milk storage pot & Bottle with Lid

Milk storage pot & Bottle with Lid

The valve and membrane for the Medela accumulates milk. When done with expressing, I will need to lift the membrane to empty out any excess milk. I have found that the Tommee Tippee membrane doesn’t collect any milk.

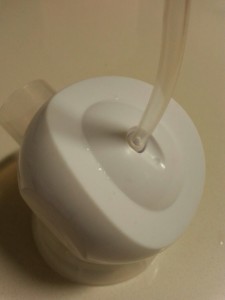
Tube connection to the connector

Tube connection to the connector

One downside to the parts is the tube connecting the motor to the pump. It looks like a generic tube that is easily replaceable. However, attaching it to the pump causes me some grief as it is not easy to fit it in seeing that the tube is soft and does not have a connector to connect both. Perhaps they would like to reconsider this aspect of the design?

Usage / Expressing

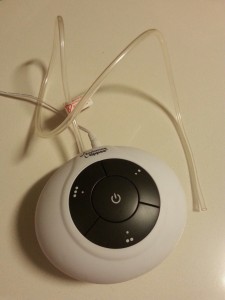
Motor

Motor

Upon turning the Tommee Tippee breast pump on, it is on a gentle suction, which is considered the let down phase. The manual suggests that the user remains on this gentle suction phase for at least 1 minute to initiate let down phase. Subsequently, the user may choose the setting that she is most comfortable with to express milk: low, medium, high.

I found the let down phase to be gentle, and surprisingly milk let down was quite quick. Once I found that milk was already being expressed, I didn’t wait for the suggested 1 minute and went straight for the kill by hitting the high suction speed. Unlike the Medela Swing, which had an increased speed for the let down phase, followed by the slow strong suction speed for the expressing, the Tommee Tippee let down phase suction speed was almost similar to the expressing phase suction speed.

What I particularly liked about the Tommee Tippee pump was that the silicone cup actually worked as a massager by depressing/massaging the area around the aerola and breast to assist in the expressing of milk. The Medela, on the other hand, depends on the strong suction to “tug” at the aerola to draw milk out. Using a strong suction level of 7-8, the Medela Swing actually causes soreness to the nipple after expressing, in comparison to the Tommee Tippee pump. Of course I can lower the suction level of the Swing, but it would possibly mean a longer expressing time for the same amount of breast milk compared to the Tommee Tippee.

What I did not like about the Tommee Tippee pump was that I was not able see how the milk was being expressed. The silicone cup made it hard to see through and see whether the milk flow was slowing down. This probably meant that I would have to depend on a set timing to express as compared to being able to see the slow down of milk flow in the Swing (which is what I usually do to decide when to stop expressing). The wide cover over the bottle also meant I could not see if there was still milk dripping into the bottle. I had to shine a light through the cup and bottle using the flash on my phone to see if the milk flow had slowed down and if milk was dripping into the bottle.

Accessories
– Sterilising / Storage Box

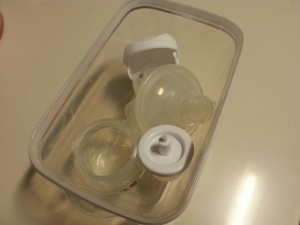
Top view: Box with one 150ml bottle and pump parts

Top view: Box with one 150ml bottle and pump parts

Side view: one 150ml bottle with pump parts.

Side view: one 150ml bottle with pump parts.

Now, this storage box is another major win in my opinion. In fact, this set for review couldn’t have come at a better time. When I went down to collect the pump, Quentin was being admitted at KKH for a case of Urinary Tract Infection (UTI). There would be moments where I had to be out of the hospital and I needed to pump or bring frozen EBM so that the nurses could feed him whilst I was away. I was a little iffy about using the common steriliser at the ward and was definitely a little sian at the thought of having to bring the bottles and pump home to wash every day. Having this microwave steriliser box meant that I have my personal steriliser catered for Quentin’s Tommee Tippee bottles and pump. On top of that, I do not have take the parts out or find a container/bag to put them. Just bring it back to the ward and put it on the table. Major WIN! The box does have a valve on the lid which allows for steam to escape whilst in the microwave. Upon taking the box out, you can close the valve to ensure that the parts remain sterilised and not be exposed to the environment.

One other detail which I felt was a nice touch on the product designer’s part is handles. The storage box has tiny handles at the sides for you to be able to carry the hot steaming box. The water will boil whilst in the microwave so the box will be VERY hot. Good on ya, Mr./Ms Product Designer.

– Storage Pot (60ml) / Box of 4 pots for S$8.90
To save on space, Tommee Tippee have also designed for their storage pots to fit snugly inside their bottles so that you can directly pump into the storage pots without having to pour the milk around. Should you freeze the EBM in the pot, you can just take the whole pot out, sit it in the bottle to bring it out and thaw/warm it later. Quentin currently consumes 80ml of EBM so I don’t foresee using it very often. However, I can foresee using it to store small amounts of EBM to mix with rice cereal / oatmeal when Quentin starts solids.

FAQs

Where can I find the Tommee Tippee Closer to Nature Electric Breast Pump?
The Tommee Tippee Closer to Nature Electric Breast Pump can be found at the following retail outlets: Mothercare, Kiddy Palace, Takashimaya Singapore Ltd, Robinsons & Co. (Singapore) Pte Ltd, Isetan (Singapore) Limited, OG Private Limited, & Pupsick Studio
How much is the Tommee Tippee Closer to Nature Electric Breast Pump?
The Tommee Tippee Closer to Nature Electric Breast Pump is retailing for S$299.

Are the parts to the Tommee Tippee Closer to Nature Electric Breast Pump replaceable and where can I find the parts?
You can replace the parts at Not Too Big, a retail outlet and service centre for Tommee Tippee products. Not Too Big is located at Forum Level 2 and is open from 9.30am -6pm.

Disclaimer: I received a complimentary set of the Tommee Tippee Closer to Nature Electric Breast Pump from Mothercare to write this review. All opinions are solely mine and are written as objectively as possible.
Category: Reviews | Tags: ,